How to Remove a Splinter: Tweezers, Baking Soda & More
Getting a splinter is one of those small annoyances that somehow always seems to happen at the worst moment. Whether you’re gardening, working on a DIY project, or walking barefoot across the deck, that sharp little intruder can lodge under your skin at the most inconvenient time. The good news: most splinters don’t require a trip to the clinic. With the right technique, you can safely extract one at home using items already in your kitchen or first-aid kit.
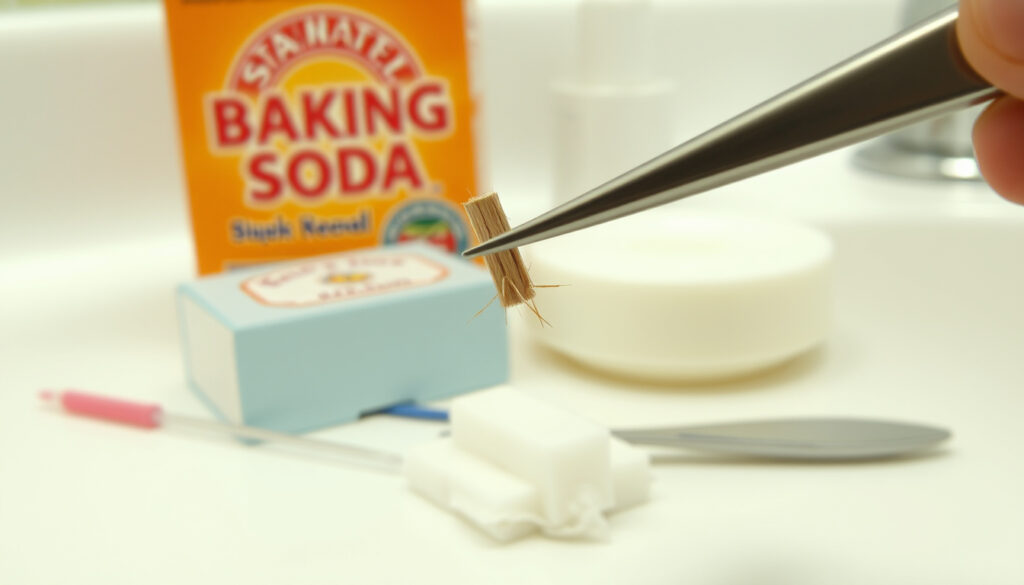
Primary tool recommended by AAD: Tweezers · Alternative from Medical News Today: Duct tape · Common home remedy per Healthline: Baking soda · Sterilization method by AAD: Rubbing alcohol
Quick snapshot
- Tweezers remain the most reliable extraction tool (Healthline)
- Sterilize tweezers with rubbing alcohol before use (Healthline)
- Pull splinters in the same direction they entered the skin (GoodRx)
- Vaseline’s effectiveness remains scientifically unverified (Healthline)
- No controlled clinical studies confirm baking soda’s efficacy (Healthline)
- Overnight success rates lack systematic documentation (Healthline)
- Healthline’s baking soda guide updated September 13, 2025 (Healthline)
- Remove splinters same day to prevent infection (GoodRx)
- Baking soda paste requires 24 hours under bandage (Healthline)
- Seek medical help for large, deep splinters or those near the eye (Solv)
- Apply antibiotic ointment after removal to prevent infection (Healthline)
- Repeat baking soda method if splinter remains after 24 hours (Healthline)
These four methods have the strongest track record in dermatological guidance and consumer health publications.
The comparison below summarizes each technique by what it works best for, how long you’ll need to wait, and where to find more details.
| Technique | Best for | Wait time | Source |
|---|---|---|---|
| Sterilized tweezers | Surface splinters within reach | Immediate | Healthline |
| Baking soda paste | Deep embedded splinters | 24 hours | Healthline |
| Duct tape adhesion | Shallow small splinters | 30 minutes | GoodRx |
| Epsom salts soak | Drawing splinters to surface | 10–15 minutes | Solv |
| Needle prying | Deeper splinters requiring elevation | Immediate | TrustCare |
| Hydrogen peroxide swelling | Similar effect to baking soda | 2–3 hours | Mountain Peaks Family Practice |
What will draw out a splinter?
Three main approaches dominate home remedy recommendations: tweezers for direct extraction, duct tape for adhesive pulling, and soaking agents for drawing splinters closer to the surface. The method you choose depends largely on how deep the splinter has lodged and what tools you have available.
Tweezers method
- Sterilize pointed-tip tweezers with rubbing alcohol or by holding the tips over a flame
- Wash hands thoroughly before beginning
- Grip the splinter as close to the skin as possible
- Pull gently along the same angle the splinter entered
- Never squeeze the skin, as this can push fragments deeper
The American Academy of Dermatology identifies tweezers as the primary recommended tool for splinter removal. Sterilization is non-negotiable — using unsterilized tools introduces bacteria directly into the wound channel.
Duct tape technique
- Press clear duct tape firmly over the splinter site
- Leave in place for approximately 30 minutes
- Peel off slowly in the opposite direction of entry
- For best results, soak the area in warm water first to soften skin
Duct tape works through adhesive force, making it ideal for splinters that haven’t fully embedded. A report from People’s Pharmacy notes that tape methods work especially well for children, who often find tweezers intimidating.
Epsom salts soak
- Dissolve 2 tablespoons of Epsom salts in warm water
- Soak affected area for 10–15 minutes
- The osmotic effect draws moisture toward the surface, bringing the splinter with it
Epsom salts soaks offer a needle-free option for those who prefer to avoid breaking the skin. The method works gradually, making it suitable for less urgent situations where you have time to wait.
The direction you pull matters more than most people realize. Pulling at an angle risks snapping the splinter, leaving fragments embedded that can fester. GoodRx guidance emphasizes pulling in the exact entry direction to avoid breakage.
How does baking soda draw out a splinter?
Baking soda works through osmotic pressure — the same mechanism that makes salt draw moisture out of food. When applied as a paste over an embedded splinter, it causes the surrounding skin to swell slightly, creating pressure that pushes the foreign object toward the surface.
Paste application steps
- Mix 1/4 teaspoon of baking soda with just enough water to form a thick paste (Healthline recipe)
- Alternative ratio: 1 tablespoon baking soda to 1 tablespoon water (GoodRx recipe)
- Clean the affected area with soap and water first
- Apply paste directly over the splinter and surrounding skin
- Cover with a bandage and leave for 24 hours
Overnight method
- After applying paste and bandage, leave undisturbed overnight
- The extended contact time maximizes osmotic swelling
- Check the site after 24 hours — the splinter should have moved closer to the surface
- Remove with sterilized tweezers if visible
- Apply antibiotic ointment to prevent infection
- Repeat the process if the splinter hasn’t surfaced after the first 24-hour period
One important caveat: Healthline explicitly notes that baking soda’s efficacy for splinter removal lacks clinical study validation. The method is widely reported and generally considered safe, but it’s based on anecdotal success rather than controlled trials. Users seeking evidence-backed approaches may prefer tweezers or needle prying.
Baking soda requires patience — a 24-hour wait — but offers a non-invasive approach suitable for children or anyone anxious about needles. For deep splinters that tweezers can’t reach, this may be your best home option.
What pulls out a deep splinter?
When a splinter has embedded deeply enough that tweezers can’t grip the exposed end, you need techniques that either bring the object closer to the surface or physically pry it loose.
Needle prying technique
- Sterilize a sharp sewing needle with rubbing alcohol
- Gently pierce the skin just above the visible portion of the splinter
- Work the needle under the splinter and lift gently
- Create enough clearance for tweezers to grip the end
- Stop immediately if you feel significant resistance — this may indicate the splinter has lodged against bone or nerve
TrustCare Health notes that needle prying is particularly useful for splinters that have gone in at an angle and created a skin flap. The technique requires steady hands and proper sterilization to avoid infection.
Home soak options
- Vinegar: The acidity softens skin over several hours. Soak for 15–20 minutes and check for surface movement.
- Epsom salts: Draws moisture toward the surface through osmosis. Use warm water for better absorption.
- Hydrogen peroxide: Causes skin to bubble and separate, potentially exposing embedded fragments. Leave on for 2–3 hours.
- Honey: Natural antiseptic properties plus mild osmotic effect. Less evidence-backed but used historically for wound care.
Solv Health advises seeking professional medical help if the splinter is large, deeply embedded, or located near the eye. Embedded splinters near joints can also damage tendons or enter joint spaces, requiring surgical removal.
How to remove a splinter without a needle?
Needles aren’t the only option when dealing with splinters that won’t come out with tweezers alone. Several non-invasive methods exist that work through different mechanisms.
Tape removal
- Apply the strongest adhesive tape you have (duct tape works best)
- Press firmly and wait 30 minutes minimum
- Peel off in the opposite direction of entry
- If the splinter doesn’t come out on the first try, repeat after soaking the area in warm water
Duct tape relies purely on adhesive force, making it one of the most accessible options. No breaking of the skin occurs, reducing infection risk.
Vaseline or glue methods
- Apply a thick layer of petroleum jelly over the splinter
- Cover with a bandage and wait 24–48 hours
- Theoretically softens skin around the splinter
Healthline indicates that vaseline’s effectiveness for splinter removal remains scientifically unverified. The method is widely mentioned online, but no authoritative health source explicitly recommends it over other options. If you try vaseline and it doesn’t work within 48 hours, move to a more evidence-backed approach.
Never squeeze the skin around a splinter in an attempt to push it out. This compresses foreign material deeper and can drive bacteria into the wound. If you feel the need to squeeze, it’s time to either use a drawing method (baking soda, soaks) or see a medical professional.
What happens if you don’t remove a splinter?
Leaving a splinter in place carries real risks that go beyond simple discomfort. Understanding these risks helps you decide when home treatment is appropriate and when to seek professional care.
Infection signs
- Increasing redness spreading outward from the splinter site
- Swelling that worsens after the first 24–48 hours
- Pus or fluid discharge from the wound
- Fever or red streaking lines leading away from the site
- Persistent pain that doesn’t decrease after removal
GoodRx guidance emphasizes prompt removal same day whenever possible. The longer a foreign object remains under skin, the higher the infection risk becomes.
Professional care triggers
- Splinter near the eye or on the face — risk of eye damage or scarring
- Deeply embedded splinters that won’t surface after 48 hours of drawing treatment
- Wood splinters, which carry higher infection risk than metal or glass
- Signs of infection already present when you discover the splinter
- Splinters in the palm or sole of foot — high bacteria environment
Solv Health specifically recommends medical consultation for splinters near the eye, those that have been in place for more than 48 hours, or any showing early infection signs. Doctors have sterile instruments and can remove embedded objects with minimal tissue damage.
For most adults, a surface splinter is a same-day home project. But for children, elderly individuals, or anyone with compromised immune systems, the threshold for professional care should be lower — don’t wait for visible infection to appear.
How to remove a splinter from a screaming child
Children and splinters go together like chalk and cheese — one minute they’re happily playing, the next they’re screaming at the sight of tweezers. The key is preparation and distraction.
Calm approach for kids
- Explain what you’re doing in simple, calm terms — “I’m going to help get the prickly thing out”
- Use duct tape rather than tweezers if possible — less scary and often effective for surface splinters
- Have a second adult hold the child’s hand or provide gentle restraint if needed
- Consider a reward system after successful removal
- For very young children, swaddling arms gently may be necessary to prevent sudden movement
Healthline reports that duct tape is often less intimidating for children than tweezers, making it a good first attempt for surface splinters in anxious kids.
When to skip home treatment
- If the child becomes physically resistant to the point of endangering themselves
- If the splinter is deep or near sensitive areas
- If multiple attempts over 24 hours haven’t worked
Forcing splinter removal on a terrified child risks worse outcomes — the child may jerk suddenly, driving the splinter deeper or causing a puncture wound. Medical professionals are trained to handle anxious pediatric patients and have better tools for the job.
“We have successfully used Scotch tape, duct tape or masking tape – whichever happened to be close at hand – for removing a fresh splinter. This works especially well for children.”
“Medically reviewed by Mia Armstrong, MD”
— Healthline medical review
Related reading: Pain on Right Side of Body Female: Causes & Red Flags · What Is Acid Reflux – Symptoms, Causes, Treatments and Relief
Frequently asked questions
What soak draws out splinters?
Epsom salts dissolved in warm water creates an osmotic effect that draws moisture toward the skin’s surface. Soak the affected area for 10–15 minutes. Vinegar soaks work similarly through acidity, softening skin over several hours. Hydrogen peroxide causes skin to bubble and separate, potentially exposing embedded fragments.
What pulls a splinter out naturally?
Baking soda paste creates osmotic pressure that causes skin to swell, pushing embedded splinters toward the surface. Apply a thick paste (1/4 teaspoon baking soda mixed with water), cover with bandage, and leave for 24 hours. Epsom salts, honey, and vinegar also draw moisture that can help surface splinters.
What draws out splinters fast?
Sterilized tweezers offer the fastest immediate removal if you can grip the exposed end. Duct tape takes about 30 minutes. Baking soda paste requires 24 hours but works for deeper splinters. For urgent situations with deeply embedded objects, a medical professional can remove the splinter in minutes using proper sterile instruments.
How to draw a splinter out overnight?
Apply baking soda paste over the splinter, cover with a bandage, and sleep. Check in the morning — the splinter should have moved closer to the surface. Remove with sterilized tweezers and apply antibiotic ointment. If the splinter hasn’t surfaced, apply fresh paste and wait another 24 hours. This method works best for splinters embedded too deep for tweezers to reach.
How to remove a deep splinter from a screaming child?
Use tape methods first (duct tape over the splinter, wait 30 minutes, peel off). If tape doesn’t work and the child is extremely resistant, skip home treatment — forcing removal risks driving the splinter deeper or causing a puncture wound. See a medical professional who can handle anxious pediatric patients with proper tools and techniques.
Does vaseline pull a splinter out?
Vaseline’s effectiveness for splinter removal lacks scientific validation. No authoritative health source explicitly recommends it over other methods. The theory is that petroleum jelly softens skin around the splinter, but evidence for actual efficacy is anecdotal. If you want evidence-backed approaches, use baking soda paste, Epsom salts soaks, or sterilized tweezers instead.
How to get a splinter out without tweezers?
Duct tape adhesion works for surface splinters — press firmly, wait 30 minutes, peel off. Baking soda paste draws deep splinters to the surface over 24 hours. Epsom salts or vinegar soaks soften skin and encourage splinter movement. For splinters you can feel but can’t grip, a needle can pry them loose — sterilize first, then gently lift the splinter’s edge to create room for your fingers or tape to grip it.
For most people dealing with a surface splinter, the choice is straightforward: sterilize your tweezers, pull in the entry direction, and apply antibiotic ointment afterward. If the splinter is deeper than tweezers can reach, baking soda paste (24-hour wait) or an Epsom salts soak offers practical alternatives that don’t require breaking additional skin. Children and anyone with compromised immune systems should see a medical professional sooner rather than waiting for infection signs to appear.
More related posts
 Dunnes Stores Festival Waistcoat: €10 Sale (XS-XL)
 Hot Tub Stays Ireland: Best Budget, Luxury & Pet Options
 Bank of Ireland Naas: Opening Hours, Phone Number & Services
 Are Opticians Open During Lockdown? Specsavers Ireland Guide
 PSG vs Atlético Madrid Stats: H2H, 4-0 Score & Key Metrics
 Face ID Not Working? How to Fix It on iPhone
 Houses for Sale Killarney: 51 Properties on Daft.ie, 24 Houses
 How to Find My Phone Samsung: SmartThings Find Guide